Time Based product types are generally used for digital products or for products that occur on a daily, weekly or even monthly basis. Time Based allows you to set an inventory for Ad Sizes and specify the increments in which that Ad Size is sold. Unlike Issue Based product types, there is no need to manually configure issue dates or schedules; you simply indicate the increments an Ad Size is sold.
- Go to Products on your left-hand navigation column
- Click the +New button
- Go through the Wizard and answer the questions
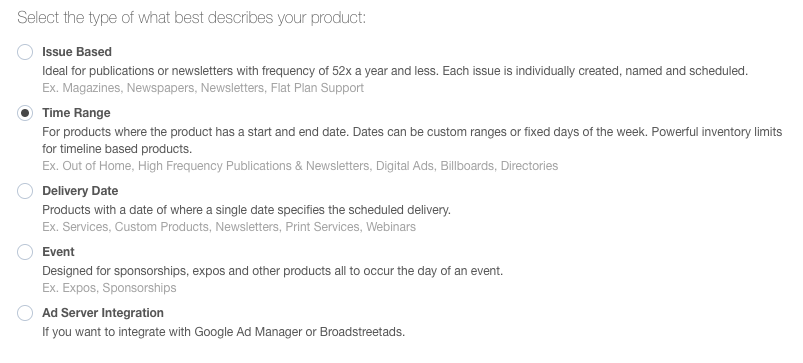
- The first question will determine how your product will be scheduled
- Time Range is for products that have a defined start and end date. Dates can be custom ranges or fixed days of the week. Powerful inventory limits for timeline based products

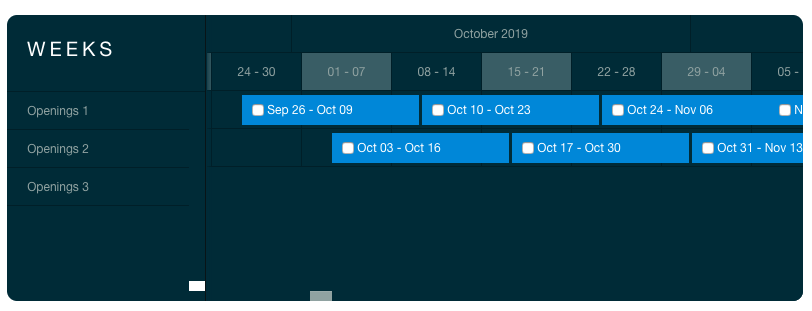
- The timeline schedule method will provider sales users with a grid that lets them choose predefined increments of time
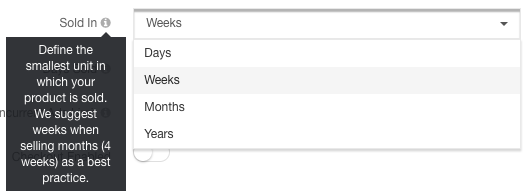
- Days, Weeks, Months or Years

- Days, Weeks, Months or Years
- Once you decide on the product type you'd like, click on the New [Product Type] button
- Name your product and Save
- Edit the product's status, color (this is the color this will show on the Production Calendar), checkout description or upload a logo if you wish; you can always edit these aspects after the product is created. Click the Update button to move on

- To edit the status, color or product logo later, click the blue Edit button in the upper right corner within the product
- Click on the Ad Sizes tab

- Click the +New drop down and select Add Size

- Name the Ad Size and enter the Width and Height

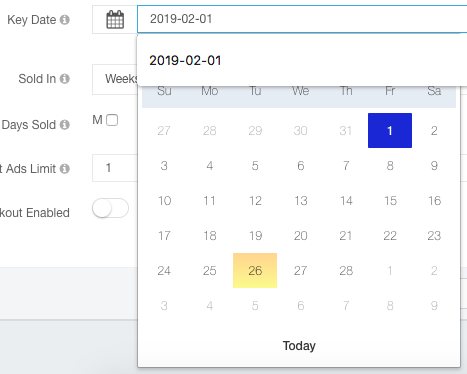
- Enter a Key Date
- The Key Date determines the first day/date that an ad displays
- if sold in Days, the Key Date is not relevant; simply choose a date in the past (generally advised to pick the first day of the month), so that the timeline calendar starts displaying available dates from that point on.
- if sold in Weeks, choose a Key Date that starts on a Monday, since you likely want your weekly increments to start on a Monday vs an arbitrary day in the middle of the week. If you choose a Monday, all bookable weeks will start on a Monday.
- if sold in Months, choose a Key Date that determines what day you want your monthly increments to display. If you want a month to start on the first of the month, then choose a Key Date that is the first of the month. If you want your months to start on the 15th of each month, choose a Key Date that is the 15th of the month.
- If sold in Yearly increments, choose a Key Date that determines when the start of your year is. Generally, you'll want to choose the past January 1, so that your years start on the first of the year.

- The Key Date determines the first day/date that an ad displays
- Choose the Sold In increments for your Ad Size

- Indicate which days of the week are allowed to be sold. If you are selling in Weeks, Months or Years you must check every day. If you are selling in Days, choose the days that are allowed to be sold

- Choose the Concurrent Ads Limit. If you have a limited inventory for this Ad Size, input how many of this Ad Size can be booked at one time. For example, if you have a position on your website that can only rotate 3 clients at a time, input your limit as 3. But if you have an unlimited inventory, put in a large quantity like, 1000000

- You can enable Checkout for this Ad Size by toggling the switch to ON. To learn more about Checkout Enabling, read this article.
- Save your changes
- You will be directed to Create an Ad Rate for this Ad Size
- Enter the Ad Rate Name
- The Ad Size will be selected in the Ad Size dropdown by default, but it is important to note that an Ad Rate is tied to an individual Ad Size. You can create as many Ad Rates for a single Ad Size as you'd like
- Specify the number of Units you'd like this Ad Rate to group together. What this does is take the Sold In increments you selected for the Ad Size and group together the number you specify here. For example, if this Ad Size is sold in Weekly increments but you'd like to group together 4 weeks to equal a month, you would input 4 Units. Then this Ad Rate would be how much it costs to run this Ad Size for a month. You can do the same if you sell in Monthly increments, but want to group together 12 months to equal a year

- Input the Ad Rate. Keep in mind that if you input a larger Unit than 1, the Ad Rate will be for how many increments you grouped together. So if you input a Unit of 4, then your Ad Rate needs to be the total cost for 4 weeks/months/years (whichever increment you chose)
- Save your changes
- Repeat steps 9-23 until you have all your Ad Sizes and their corresponding Ad Rates added
